Since getting my Kamodo grill, preparing a chunk of meat, say pork butt or a rack of ribs or brisket, and smoking it low and slow has quickly become my favorite type of BBQ.
It’s a long process though, which makes the weekend an ideal time; I get the meat on early, say ten o’clock, and let it smoke away at 225° F (or as close to that temperature as I can maintain) until about six o’clock. A mop every hour or so is all the attention it needs, which gives plenty of time for double digging my wife’s new garden beds (while my 2 1/2 year old assiduously fills them in again).
It was pork butt last weekend, enough to feed a crowd. Which it did. It was so popular in fact, that by the time I made to the table the platter had a mere scrap left. Hardly enough to feed a mouse. But there was some satisfaction to be had in the satisfaction of others. And at least three people went away determined to delve into the delicious world low and slow smoking.
So here’s the recipe. I hope you enjoy it as much as my family and friends do. It is essentially a recipe for pulled pork, but without the pulling and without a vinegar sauce. I served the pork, pulled into rough chunks, with a homemade BBQ sauce on the side.
Every BBQ has its own eccentricities which take time to learn, so don’t be discouraged if things aren’t perfect on your first try. The hardest part of low and slow cooking is maintaining a good temperature. Something between 225°-250° F is ideal, but you’ll still get mouth-watering results if your temperature creeps higher (even up to 350° F).
Give yourself 8+ hours, plus prep time, plus resting (though if your BBQ stubbornly refuses to stay around 225° the cooking time will be reduced). You’ll want to take your pork butt off when the internal temperature is between 190°-205° F, then wrap it in foil and let it rest for an hour.
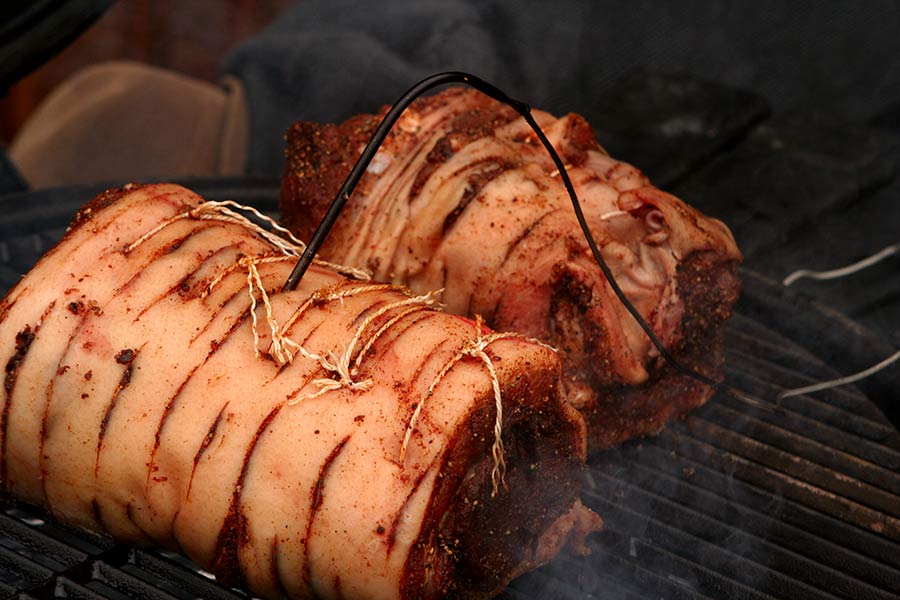
I have a thermometer with two probes which has been invaluable. One probe goes into the meat and the other sits on the cooking grid to monitor the BBQ temperature, then it’s just a matter of adjusting vents to keep the temperature where I want it.
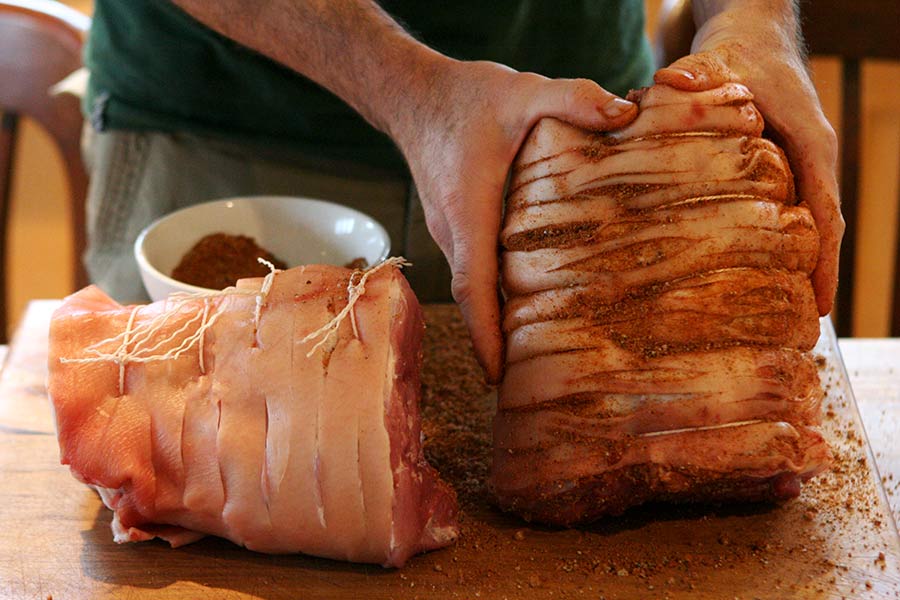
1 Boston butt (6-7 lbs), rolled and tied
4 tablespoons of Barbecue rub (recipe below)
Wood chips (soaked, if you’re cooking with charcoal)
1 cup cider vinegar
1 small onion, sliced thinly
1 hot pepper (such as jalapeno), sliced thinly
1 tablespoon coarse salt
1 tablespoon brown sugar
1 teaspoon black pepper
Combine all ingredients in a glass bowl (or something else non-reactive) and whisk until the salt is dissolved. You’ll brush this sauce onto the meat as it cooks.
1/4 cup packed brown sugar1/4 cup paprika (good quality fresh paprika makes a big difference here)
3 Tablespoons black pepper (I would recommend crushing whole peppercorns in a mortar and pestle or spice grinder, the flavor is much better)
4 Tablespoons coarse salt
2 teaspoons garlic powder
2 teaspoons onion powder
1 teaspoon cayenne pepper
Combine all ingredients in a bowl and mix. You’ll use all the rub for the pork butt, however make sure to set aside a tablespoon if you’re going to make the homemade BBQ sauce.
2 cups ketchup
1/4 cup cider vinegar
1/4 Worcestershire sauce
1/4 cup packed brown sugar
2 Tablespoons dark molasses
2 Tablespoons mustard (I use a spicy horseradish mustard, but anything would work)
1 Tablespoon BBQ rub
2 teaspoons liquid smoke
1/2 teaspoons freshly ground black pepper
Optional: 1 Tablespoon Tabasco sauce if you want to up the heat
Combine all the ingredients in a saucepan and bring it slowly to a boil. Reduce the heat so the sauce is simmering gently for around 10-15 minutes. It should be dark and rich. Taste and adjust the seasonings until you’re happy. Stored in the fridge this sauce will keep for several months.
If you’re organized (which I often am not), you should rub the pork butt with the BBQ rub the day before cooking it. However, lack of planning won’t ruin the meat and you can go so far as to apply the rub immediately before cooking. (Just make sure your meat is at room temperature before putting it on the BBQ).
Regardless of your time frame, cover the pork butt thoroughly with the BBQ rub, making sure to rub it into all the crevices. I get my meat from the local butcher who rolls it and scours it for me, make sure to scour yours with a knife (as in the pictures) if it’s not already done.
On the day of cooking, start your BBQ or grill. The idea is to keep the temperature low and steady for the length of cooking, the technique for doing this will depend on your BBQ. I’ll give a run down of how I do this on my Kamodo charcoal grill and how to do this on a gas grill.
I stick a firelighter at the bottom of a large pile of lump charcoal and light it, leave the lid open for around 10 minutes, then put on a large pizza stone (wrapped in aluminum foil) to act as a heat deflector. (The pizza stone sits on a low rack halfway between the charcoal and the cooking grid.) Then the cooking grid goes on and the lid is closed.
There are two vents on my Kamodo, one at the top and one at the bottom. I keep both of these open until the internal grill temperature reads 150° F on my probe thermometer (there is a thermometer built into the BBQ but it isn’t accurate). Once 150°F is reached, I scatter the soaked wood chips on the coals, put the meat on (fat side up), and begin to slowly close both vents. The important thing here is to be careful not to put the fire out while not letting the BBQ get too hot too quickly. By the time 225° (ish) is reached the vents are only fractionally cracked and require hardly any adjustment for the rest of the day.
The trick for cooking low and slow on a gas grill is to turn on your burners for indirect cooking. So if you have a three burner grill, heat the right or left burner at low and leave the other two off. The ideal temperature is exactly the same as a charcoal grill: keep it as close to the 225°-250°F range as possible. Place your rubbed meat, fat side up, as far from the heat source as possible.
You’ll also need a smoker tray for the wood chips, such as this one: http://www.appliancefactoryparts.com/search/part/12/
Put your dry wood chips in the container and place the container over the hot burner.
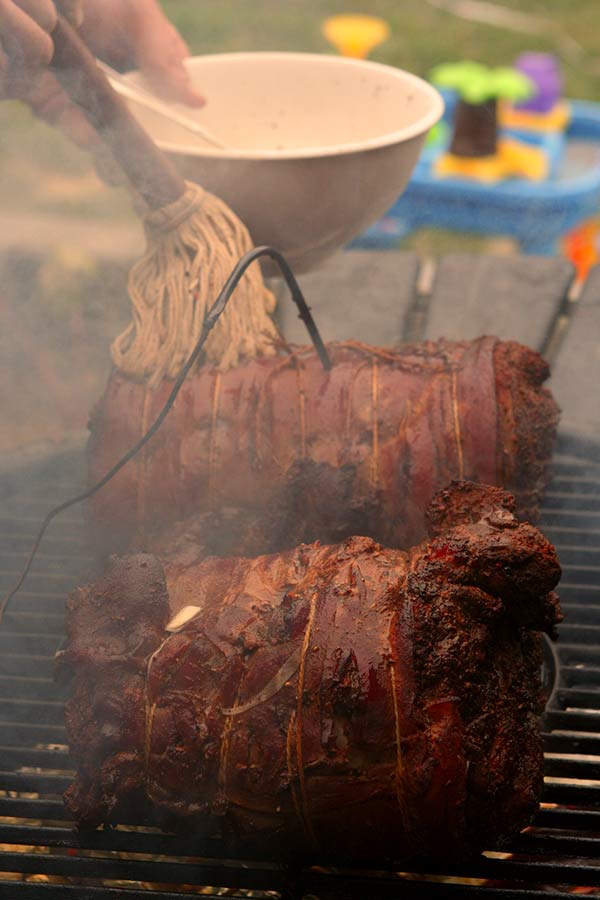
Once the outside of the meat is cooked (around an hour or two) it’s time to start basting in the vinegar mop sauce. Continue to mop the pork every hour, this is also the time when you can add more wood chips if you want. The meat is done when it reaches an internal temperature of 190°-205°F.
When the internal temperature is reached, take the pork into the kitchen and wrap in aluminum foil for an hour. Then cut it up, pull it apart, shred it, or whatever you want. It is delicious served with the BBQ sauce recipe above, or with any of the Grumpy’s sauces.
And enjoy!
David B. April 9th, 2013
Posted In: Meat Poultry & Fish, Recipes, Rubs Bastes & Glazes, Sauces & Accompaniments

Scrumptious and garlicky; these shrimp are perfect as an appetizer or the feature in a fantastic salad.
If you really want to splurge, get enough to fill up on –you won’t find a tastier meal.
Serves 4
12 large shrimp or prawns
1/4 cup butter
2 garlic cloves, minced
1/4 cup lemon juice
2 tablespoons freshly chopped parsley
Sat and freshly ground pepper
Minced red chili or red pepper flakes (optional)
Lemon wedges
1. Preheat grill to medium heat.
2. Shell and de-vein the shimp, leaving the tails on if desired.Put them in a large zip lock bag.
3. Melt the butter and mix in the rest of the ingredients, except the lemon wedges. (If you like things extra garlicy, go ahead and add another clove) Don’t forget to season with salt and pepper!
4. Pour the butter mixture into the bag with the shrimp, push out as much air as you can, and leave to marinate for about half an hour in the fridge.
5. You can either grill them directly separatly, or by threading them onto a skewer for less tedious turning. If using a skewer, curve the shrimp around and push it through both the tail and near the head.
6. Grill for a couple minuts on each side. Serve with lemon wedges and gobble them up. 🙂
David B. October 15th, 2012
Posted In: Appetizers, Meat Poultry & Fish, Recipes, Salads

Planking is a great, easy way to grill; and is particularly suited to delicate foods like fish. The wood plank protects the flesh from the intensity of the flames or burners while imbuing it with delicious smokey flavors. However longer cooking meats like chicken will always pick up more smokiness since they’re exposed to the smoke for much longer.
And planking isn’t only for those cooking with charcoal, this technique works perfectly on gas grill as well!
You can use a variety of timber for planking, cedar isn’t the only option. Apple, alder, hickory –just be sure the wood isn’t treated!
Before grilling, the wood needs to be soaked it in a tub of water for at least an hour (to reduce the chance of it catching on fire). For another layer of flavor try adding a cup of juice or a splash of bourbon to the soaking water.
After soaking, put the plank on a preheated medium grill for a couple minutes on each side. You want the plank to be smoking and cracking before you put your food on it –this will make sure you get the maximum smokey flavor.
Now you’re ready to cook! Brush some oil on the hot plank, and put your food directly on it. No turning needed. Be sure to keep the lid closed as much as possible since a lot of the flavor from planking comes from the smoke.
A few other notes:
Be sure to keep a spray bottle on hand while cooking on a plank. The wood can catch fire, you need to be able to quickly extinguish any flare-ups.
Even though salmon is the traditional planking food, don’t limit yourself. Pretty much any fish is delicious cooked in this way. Also chicken, pork loins, vegetables. Really, anything you’d cook over an indirect heat. Marinate and season as you’d like, then cook it on the plank.
Cedar planks can be reused a number of times, as long as there is wood left. Depending on the length of cooking, I would expect around three uses. Don’t forget to soak it before each use.
Be sure to remove the plank as soon as you’re done cooking, otherwise the wood will just burn up. And if you’re using a gas grill, it will make a big mess in your burners.
Sauce:
1/4 cup pineapple juice
1/3 cup soy sauce
2 tablespoons apple cider vinegar
2 tablespoons lemon juice
1 tablespoon olive oil
3/4 cup honey
1/4 cup brown sugar, packed
1/2 teaspoon cayenne pepper
1/2 teaspoon paprika (Preferably hungarian paprika. Try smoked paprika for an even bigger punch. Or even smoked spicy paprika.)
1 garlic clove, minced
Freshly ground black pepper (about a teaspoon)
6 salmon filets, skinless and boneless
Salt
Freshly ground black pepper
2 cedar planks
Directions:
Prepare the planks as above.
Preheat the grill, medium heat.
Put the juice, soy sauce, vinegar, lemon juice, oil, and honey in a small saucepan and bring to a simmer over med-high heat. Reduce to med-low and stir in the rest of the sauce ingredients, cooking until it has reduced to and coats a spoon. About 20 minutes. Remove from the heat.
Sprinkle the salmon filets with salt and pepper
Your cedar planks should be finished soaking and be ready to put on the preheated grill. Leave them for a couple of minutes over the burners, until they start to smoke, then brush them with oil and pop the salmon filets on top. Close the lid, cook for 5 minutes, then spread a little of the sauce over the salmon. Put the lid back on and cook another 5 minutes. Apply another layer of glaze to the fish. Cook another 5 minutes or until the fish is opaque throughout.
Serve with the rest of the sauce, and enjoy. 🙂
David B. September 3rd, 2012
Posted In: BBQing HowTos, Meat Poultry & Fish, Recipes

I kept this chili powder intentionally mild since there were a lot of young kids eating the steak. Ancho chilies run more sweet than hot.
David B. January 23rd, 2012
Posted In: Marinades, Meat Poultry & Fish, Recipes

The Meat:
1. Combine all the marinade ingredients in a bowl, then place the ribs in a plastic or glass dish and cover with the marinade.
2. Refrigerate overnight.
3. Set up your BBQ for indirect cooking. You are looking for a medium-low heat here, so be careful not to overcook it.
Tip:
If you are using a charcoal grill, it is recommended to leave at least half of the fire bed free of coals.
If using a gas grill with a lid, turn for example your left burner on and cook towards the right hand side.
4. Place the ribs in a heavy roasting pan and place on the cool part of the grill.
5. Close the lid, and cook for about 1 hour 15 minutes. Baste the ribs every 20 minutes with your marinade.
6. Add more coals to the fire or turn up the burner so the grill is medium hot.
7. Remove the ribs from the pan and place directly on the grill grate.
8. Cook for 5 minutes on each side, or until caramelized and lightly charred.
9. While the ribs are cooking, place some of the marinade in a saucepan on the grill, bring to a boil and reduce by half to serve as sauce with the ribs.
10. Enjoy, with your favorite beverage!
David B. December 6th, 2011
Posted In: Marinades, Meat Poultry & Fish, Recipes

Make sure your grill is super clean. Any residue will cause the fish to stick.
Preheat the grill until it is very hot before putting the fish on.
Coat the fish very thinly with oil before cooking.
After you set the fish on the hot grill, leave it there! Don’t move it for at least a couple of minutes. This will give it time to sear and separate from the grill. When you do move it, wiggle it carefully and then roll it over.
David B. March 25th, 2011
Posted In: BBQing HowTos, Meat Poultry & Fish

Ah, Shish Kebabs. Many people’s memory of a shish kebab is an incongruous combination of uncooked vegetables and tough chewy overcooked meat. Whether it is a flaccid bit of zucchini or the escaping tomato, there are many ways do shish kebabs wrong, which is why they have a pretty bad rep. We were determined to find a way that is both pleasurable to eat, and doesn’t require a lot of fluffing around. I tried a number of different techniques from my disturbingly large collection of cookbooks as well as online, and we found a lot of recipes but none that really satisfied all our criteria.
The main problem with shish kebabs is that the meat cooks much faster than most vegetables. This makes your vegetable choices actually quite limited. We had the best results with bell peppers and onions. They cook at a similar rate to lamb and the combination suits perfectly. We tried using a rub on the kebab, but because the meat cooks too quickly, it leaves an unappetizing taste and texture. However, marinades work fantastically.
Step 1.
Combine lamb and your choice of marinade (see below) in a large bowl or plastic bag for as long as you can (minimum 2 hours or preferably overnight).
Step 2.
If using wood skewers, pre-soak at least 30 mins in advance so they don’t catch fire.
Step 3.
Start preheating the barbecue.
Step 4.
Thread each skewer in this order:
1 piece of meat
1 stack of onion (about 3 layers)
2 pieces of pepper
Repeat to fill your skewer – ending with a piece of meat.
Step 5.
Grill the kebabs uncovered until meat is browned all over. Cook for roughly 7 minutes for medium rare but this will vary depending on how hot your grill gets.
Both of these marinades simply need to be processed in your food processor until smooth. Enjoy.
Rosemary and Mint Marinade
10 large mint leaves
1 1/2 teaspoons chopped fresh rosemary leaves
2 tablespoons juice from a fresh lemon
4 garlic cloves
1/2 cup olive oil
1 teaspoon salt
A few turns of freshly ground black pepper
Parsley Marinade with Ginger and Spices
1/2 cup packed fresh parsley leaves
1 jalapeño chile
2 tablespons fresh ginger, grated roughly
4 garlic cloves
1 teaspoon ground cumin
1 teaspoon ground cardamom
1 teaspoon ground cinnamon
1/2 cup olive oil
1 teaspoon salt
A few turns of freshly ground black pepper
David B. February 25th, 2011
Posted In: Marinades, Meat Poultry & Fish
The following are my current favorite patty recipes. Nothing beats homemade patties and I’ve stockpiled the freezer with them for the ultimate convenience meal.
All recipes make approximately 20 patties.
Note: All my recipes are fabulously delicious and there is no way you’ll be able to eat just one. That’s why you’ll note that all the recipes are for 5 pounds of meat – not that I eat all that in one sitting. I like to make bigger batches and freeze them purely for convenience, but you can easily half or quarter the recipe if you want.
The black pepper in these patties has a surprising bite. Make sure to use fresh nutmeg, it makes all the  difference. Also, the better the paprika, the better the patties. Hungarian paprika is the best.  These are my wife’s favorite patties.
Delicious and complex. The fennel seeds in this recipe give amazing depth of flavor.
A very well balanced beef patty. Robust and hearty. Again the quality of paprika is key. Keep in mind that the patties will taste the best and be juiciest with ground beef that has more fat in it.
Combine all ingredients except liquid together in a large bowl. Add water and mix either with a mixer or your hands, until the mixture has bound together.
The patty will emulsify, which helps bind the patty together. We don’t typically like to add a binder, but you could add breadcrumbs, eggs, or even cheese, if you wish. You will need to experiment with quantities, so we really recommend you give it a try without any other binder first.
Don’t forget your mayonnaise. Enjoy!
David B. November 10th, 2010
Posted In: Meat Poultry & Fish, Recipes
A popular grill recipe, we found a number of variations when we were researching ideas for our experiment. Some people smoked the bird, some covered it in a rub, some brined, some even baked in the oven! However the one thing we didn’t find were any tests on the various flavors you could get from using different beers – every recipe we saw either used a lager or didn’t specify.
Since the recipe seems to center around beer we were a bit surprised that more attention hadn’t been given to this aspect. However, as keen beer drinkers we were more than prepared to do the leg work ourselves. A quick stop at the supermarket later we had our supplies: 3 bottles of beer (1 Dopplebock (Aventus), 1 extra hoppy IPA (Epic Armageddon), 1 strong English Ale (Fuller’s 1845), 3 chickens, and 1 can of Dr Pepper (a good excuse to buy my fizzy drink of choice).
The technique can basically be divided into 4 steps: prepare the can, prepare the chicken, insert the can, and place on the grill. Something so simple surely must not have much room for error. Well, it does.
Our first chicken used the Strong English Ale. The can was half filled, inserted, and cooked without any problems. A delicious, crispy skinned bird resulted. However, we couldn’t taste any beer flavor or anything that we could contribute to the beer. It just tasted like a very nicely cooked chicken.
Our second chicken was paired with the extra hoppy IPA, or at least it was supposed to be. The can was half filled, as required, and the rest of the bottle was quickly polished off. Then we moved onto insertion, this was a mistake! With no beer reserves, when the can tipped over during the first insertion attempt and we lost around half of what was in the can, we were in dire straits. Yes, I admit, there was a small amount of cursing going on in the room. Then, at the second insertion attempt, when the greasy chicken flew out of my husband’s hands and skidded across the kitchen floor… well it was just hysterical laughter at that point. Of course by now the can was empty. We made a quick substitution of a tasty Mead (medium sweet), thinking a honey flavor could go quite nicely with chicken, and finally managed, on the third try, to get the can into the chicken. This one cooked up beautifully again, crispy skin, succulent flesh, but no apparent flavor from the mead.
Our third chicken was cooked with Aventus Dopplebock (the best beer of the bunch in my opinion). Everything went smoothly and the result at the end was again nicely cooked. This time however, we could taste some flavor imparted by the beer, albeit faint. The chicken was mildly richer and slightly sweeter. It also gave the flesh a rosy pinkness. I have to stress that these differences were very mild, and I personally would get much more pleasure out of drinking every drop of this beer myself.
So in conclusion, the technique itself produces nicely cooked chickens with the important crispy skin, however the beer used didn’t seem to make must of a difference. From our results it seems likely that any liquid would do the trick. A bit disappointing, but interesting nonetheless.
I wonder what would happen if I marinated the chicken in the beer though… hmm

Ingredients:
1 whole chicken
1 can (if your beer of choice is in a can, then use that, but if you’re using a bottled beer then use a soda can)
1/2 a can of beer
Butter or olive oil
Salt and Pepper
–Because the main purpose of this experiment was to test the results of using different beers, we decided that smoking the chicken or applying a rub would cover up the beer flavors and so shouldn’t be used in our experiment. However, if you want to smoke or put a rub on your Beer Can Chicken, feel free! We have included instructions for both.–
Start your grill so it has time to preheat before putting the chicken on to cook.
We used a gas grill for this recipe, but if you want to use a charcoal BBQ, that will work as well.
This recipe uses indirect cooking. If you are using a gas grill, make sure to only turn on a burner away from where the chicken will be sitting. (We used a temperature of Med-High). If you are using a charcoal BBQ, make sure to move the coals either to one side (so the chicken can be place on the opposite side of the grill), or to both sides with an empty space in the middle (so the chicken can be placed in the middle over this empty space).
Smoking: If you are smoking your chicken, start soaking the wood chips now.


If you’re using a soda can like us, then drink all the contents, otherwise, if the beer you’re using is in the can, drink approximately half the can.
Poke some holes in the top of the can (we made 6 holes) using whatever aluminum poking instrument you have handy. We used kitchen shears, maybe not the best option, but it was all we could find. For our second chicken we cut the top all the way off in the hopes that this would increase the beer penetration. However, it didn’t seem to make much of a difference.
If you’re using bottled beer, fill the can halfway. Make sure to let the foam settle before drinking the rest, you may need to top up your can!

Now you need to grease up and season the chicken. This will give you crispy skin that you won’t be able to resist no matter how health conscious you are. (Yes I admit it; crispy skin is my favorite part of the whole chicken).
Using someone else’s hands (if you’re like me and hate touching raw meat), rub softened butter or oil all over the chicken.
Season (generously!) with salt and sprinkle on some black pepper. (Of course this does come down to personal taste, but I like my chicken skin only lightly peppery but very salty, think potato chips.)
Applying a Rub: If you are putting a rub on the chicken, do this instead of seasoning with salt and pepper. Rub your chosen dry rub all over the chicken, particularly under the skin as much as possible, and then rub oil all over the chicken. See the rub recipe at the bottom of this post.


Really, it is impossible not to laugh at this step.
Insert the can half filled with beer into the chicken’s opening. It is at the rear side, hence the other name for this recipe ‘Beer Butt Chicken’.
Be careful not to tip the can over or drop the greasy chicken like we did.

Carefully place the can with the chicken on top onto the preheated grill. Make sure to put it on the side away from the heat source.
Put the lid on and open the top vent.
Cooking time can vary considerably, depending on the size of your bird and the actual temperature of your grill. An instant read thermometer will be the most accurate way to tell when your chicken is done.
Check the temperature after 1 hour by sticking the thermometer into the chicken’s thigh (making sure not to touch the bone) and the breast, it will read 170 degrees F when the chicken is done.
Smoking: If you are smoking the chicken, put the drained wood chips on the coals when you put the chicken on the BBQ.

——
This recipe is a great starting point, adjust and add to it as you like.
Ingredients:
4 Tablespoons paprika
2 Tablespoons salt
2 Tablespoons sugar
2 Tablespoons brown sugar
2 Tablespoons ground cumin
2 Tablespoons chili powder
2 Tablespoons freshly ground black pepper
1 Tablespoon cayenne pepper
Combine all the ingredients in a small bowl and mix well. Reserve until needed.
David B. May 17th, 2010
Posted In: Meat Poultry & Fish, Recipes
8 Chicken thighs
2 cloves garlic
3 – 4 tablespoons mustard
2 limes, juiced
5.3oz. polenta
1.1lb. zucchinis
1.7oz. oil
4 teaspoons cracked black peppercorns
2 teaspoons mixed herbs
Salt and pepper
7oz. spicy tomato relish
Additional limes
Dry the thighs with a paper towel. Crush the garlic and mix with the mustard and lime juice. Brush the chicken with the mustard mix and coat with the polenta.
Preheat the grill and grill the chicken on the hot plate until crisp and tender.
Cut the zucchinis into quarters, and season with the oil, cracked pepper, mixed herbs and salt and pepper. Place on the grill and cook turning frequently.
To serve, stack the zucchini chips and place the grilled chicken on top. Serve with the tomato relish and fresh grilled limes.
David B. February 9th, 2010
Posted In: Meat Poultry & Fish
