Since getting my Kamodo grill, preparing a chunk of meat, say pork butt or a rack of ribs or brisket, and smoking it low and slow has quickly become my favorite type of BBQ.
It’s a long process though, which makes the weekend an ideal time; I get the meat on early, say ten o’clock, and let it smoke away at 225° F (or as close to that temperature as I can maintain) until about six o’clock. A mop every hour or so is all the attention it needs, which gives plenty of time for double digging my wife’s new garden beds (while my 2 1/2 year old assiduously fills them in again).
It was pork butt last weekend, enough to feed a crowd. Which it did. It was so popular in fact, that by the time I made to the table the platter had a mere scrap left. Hardly enough to feed a mouse. But there was some satisfaction to be had in the satisfaction of others. And at least three people went away determined to delve into the delicious world low and slow smoking.
So here’s the recipe. I hope you enjoy it as much as my family and friends do. It is essentially a recipe for pulled pork, but without the pulling and without a vinegar sauce. I served the pork, pulled into rough chunks, with a homemade BBQ sauce on the side.
Every BBQ has its own eccentricities which take time to learn, so don’t be discouraged if things aren’t perfect on your first try. The hardest part of low and slow cooking is maintaining a good temperature. Something between 225°-250° F is ideal, but you’ll still get mouth-watering results if your temperature creeps higher (even up to 350° F).
Give yourself 8+ hours, plus prep time, plus resting (though if your BBQ stubbornly refuses to stay around 225° the cooking time will be reduced). You’ll want to take your pork butt off when the internal temperature is between 190°-205° F, then wrap it in foil and let it rest for an hour.
I have a thermometer with two probes which has been invaluable. One probe goes into the meat and the other sits on the cooking grid to monitor the BBQ temperature, then it’s just a matter of adjusting vents to keep the temperature where I want it.
1 Boston butt (6-7 lbs), rolled and tied
4 tablespoons of Barbecue rub (recipe below)
Wood chips (soaked, if you’re cooking with charcoal)
1 cup cider vinegar
1 small onion, sliced thinly
1 hot pepper (such as jalapeno), sliced thinly
1 tablespoon coarse salt
1 tablespoon brown sugar
1 teaspoon black pepper
Combine all ingredients in a glass bowl (or something else non-reactive) and whisk until the salt is dissolved. You’ll brush this sauce onto the meat as it cooks.
1/4 cup packed brown sugar
1/4 cup paprika (good quality fresh paprika makes a big difference here)
3 Tablespoons black pepper (I would recommend crushing whole peppercorns in a mortar and pestle or spice grinder, the flavor is much better)
4 Tablespoons coarse salt
2 teaspoons garlic powder
2 teaspoons onion powder
1 teaspoon cayenne pepper
Combine all ingredients in a bowl and mix. You’ll use all the rub for the pork butt, however make sure to set aside a tablespoon if you’re going to make the homemade BBQ sauce.
2 cups ketchup
1/4 cup cider vinegar
1/4 Worcestershire sauce
1/4 cup packed brown sugar
2 Tablespoons dark molasses
2 Tablespoons mustard (I use a spicy horseradish mustard, but anything would work)
1 Tablespoon BBQ rub
2 teaspoons liquid smoke
1/2 teaspoons freshly ground black pepper
Optional: 1 Tablespoon Tabasco sauce if you want to up the heat
Combine all the ingredients in a saucepan and bring it slowly to a boil. Reduce the heat so the sauce is simmering gently for around 10-15 minutes. It should be dark and rich. Taste and adjust the seasonings until you’re happy. Stored in the fridge this sauce will keep for several months.
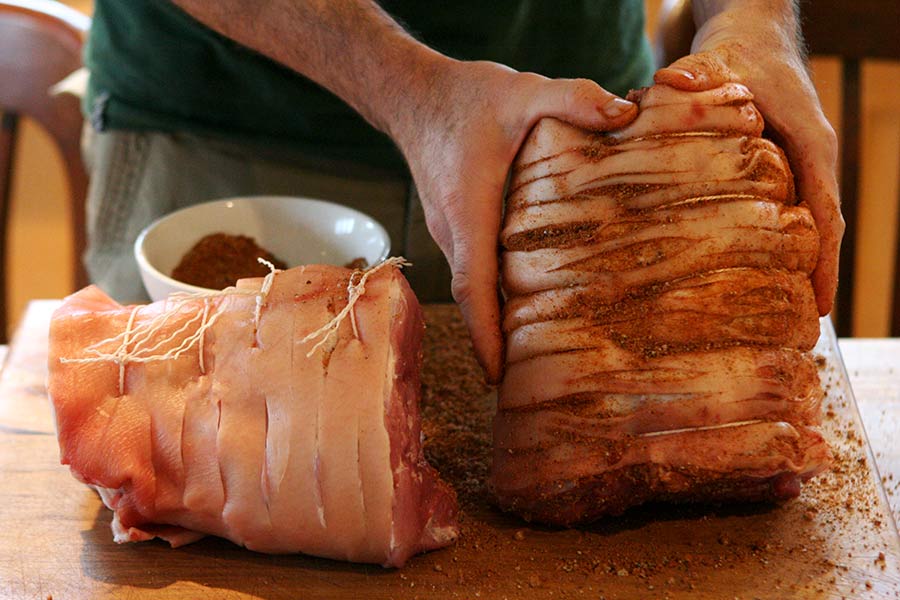
If you’re organized (which I often am not), you should rub the pork butt with the BBQ rub the day before cooking it. However, lack of planning won’t ruin the meat and you can go so far as to apply the rub immediately before cooking. (Just make sure your meat is at room temperature before putting it on the BBQ).
Regardless of your time frame, cover the pork butt thoroughly with the BBQ rub, making sure to rub it into all the crevices. I get my meat from the local butcher who rolls it and scours it for me, make sure to scour yours with a knife (as in the pictures) if it’s not already done.
On the day of cooking, start your BBQ or grill. The idea is to keep the temperature low and steady for the length of cooking, the technique for doing this will depend on your BBQ. I’ll give a run down of how I do this on my Kamodo charcoal grill and how to do this on a gas grill.
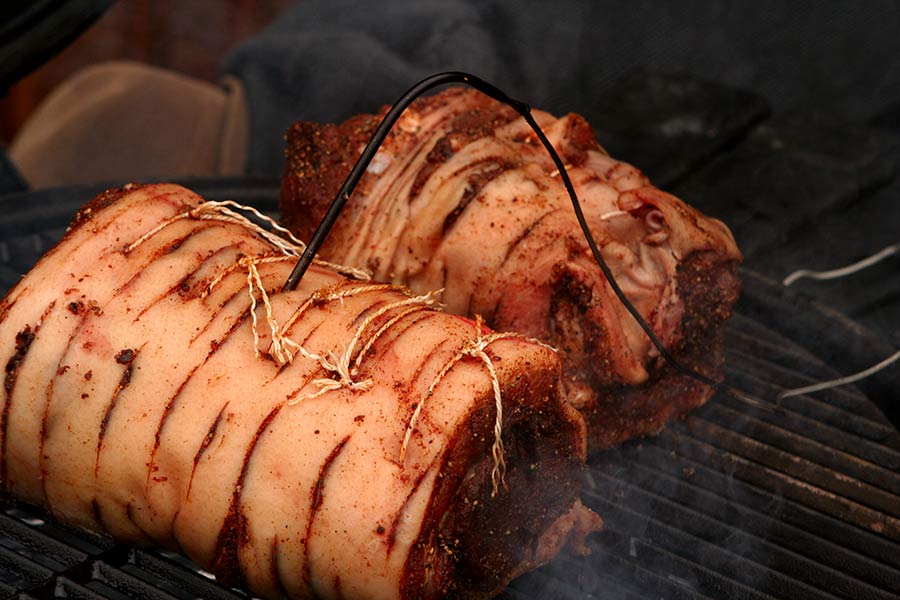
I stick a firelighter at the bottom of a large pile of lump charcoal and light it, leave the lid open for around 10 minutes, then put on a large pizza stone (wrapped in aluminum foil) to act as a heat deflector. (The pizza stone sits on a low rack halfway between the charcoal and the cooking grid.) Then the cooking grid goes on and the lid is closed.
There are two vents on my Kamodo, one at the top and one at the bottom. I keep both of these open until the internal grill temperature reads 150° F on my probe thermometer (there is a thermometer built into the BBQ but it isn’t accurate). Once 150°F is reached, I scatter the soaked wood chips on the coals, put the meat on (fat side up), and begin to slowly close both vents. The important thing here is to be careful not to put the fire out while not letting the BBQ get too hot too quickly. By the time 225° (ish) is reached the vents are only fractionally cracked and require hardly any adjustment for the rest of the day.
The trick for cooking low and slow on a gas grill is to turn on your burners for indirect cooking. So if you have a three burner grill, heat the right or left burner at low and leave the other two off. The ideal temperature is exactly the same as a charcoal grill: keep it as close to the 225°-250°F range as possible. Place your rubbed meat, fat side up, as far from the heat source as possible.
You’ll also need a smoker tray for the wood chips, such as this one: https://www.appliancefactoryparts.com/search/part/12/
Put your dry wood chips in the container and place the container over the hot burner.
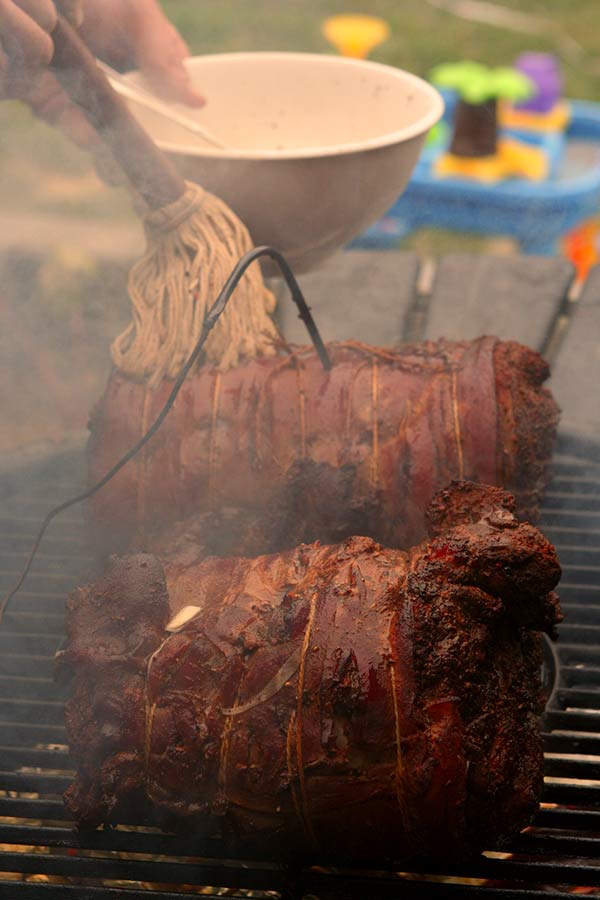
Once the outside of the meat is cooked (around an hour or two) it’s time to start basting in the vinegar mop sauce. Continue to mop the pork every hour, this is also the time when you can add more wood chips if you want. The meat is done when it reaches an internal temperature of 190°-205°F.
When the internal temperature is reached, take the pork into the kitchen and wrap in aluminum foil for an hour. Then cut it up, pull it apart, shred it, or whatever you want. It is delicious served with the BBQ sauce recipe above, or with any of the Grumpy’s sauces.
And enjoy!
David B. April 9th, 2013
Posted In: Meat, Poultry, and Fish, Recipes, Rubs, Bastes, and Glazes, Sauces and Accompaniments
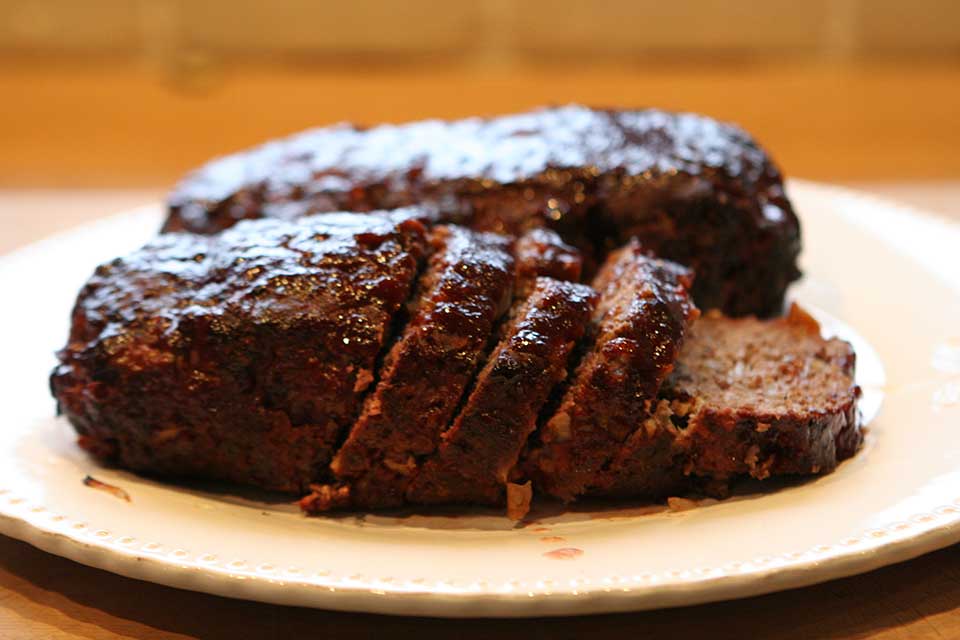
Meatloaf is one of those infamous recipes that can be fantastically moreish or bland as catfood. Smoking meatloaf and adding a dollop of spicy BBQ sauce puts this firmly in the can’t-stop-eating-better-put-on-my-stretchy-pants camp.
This recipe is fast to prepare and easy to cook.
This recipe was cooked with lump charcoal, on a Chargriller Kamodo Acorn. Weber kettles, Big Green Egg, etc, also work great for smoking. But not to worry, this will taste great even on gas grills that can indirect cook.
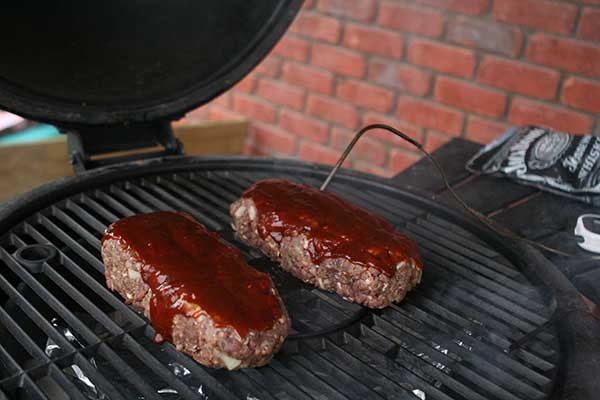
Set your BBQ up for indirect grilling. You want a low-medium cooking temperature of about 300 degrees.
Optional: Add a handful of wood chips to some water, allow 30 minutes to soak so the wood chips don’t burn. You’ll want to add the wood chips at the same time as you add the meatloaf for maximum smokey goodness.
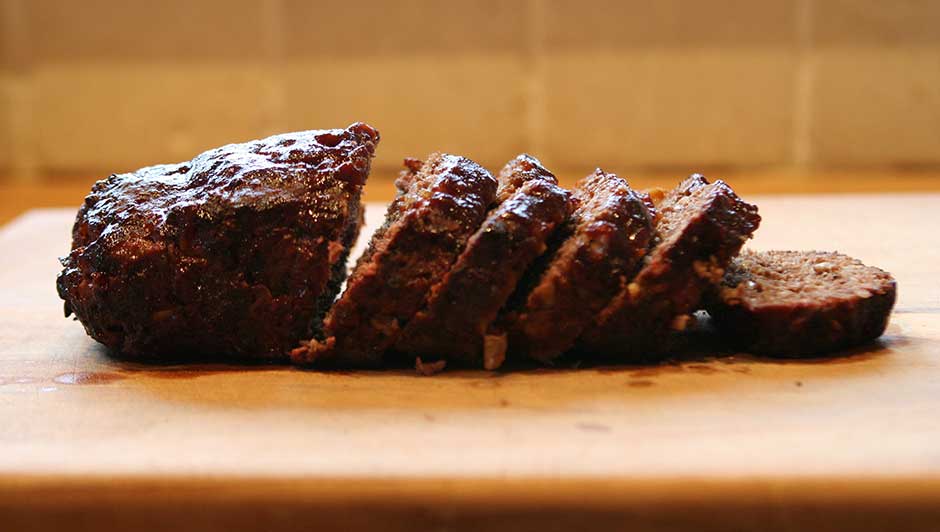
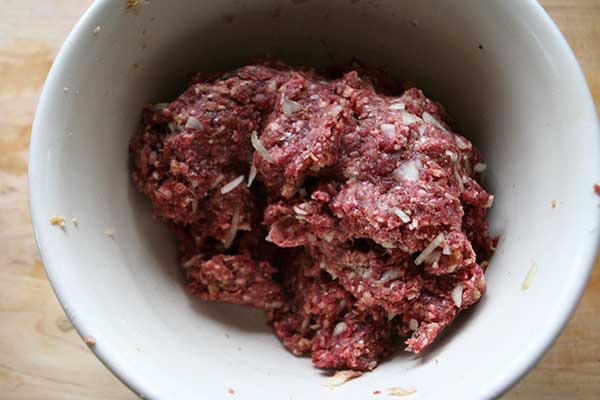
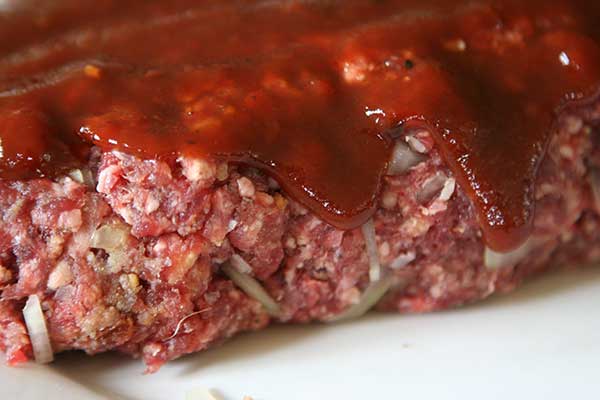
In a large bowl mix all the ingredients together. Divide the recipe in half. Mold each half meatloaf into logs, about 7 or 8 inches long, and 4 inches wide. Mix the sauce ingredients. Set aside half the BBQ sauce for serving. Spread half the sauce mixture onto the formed loafs.
Put the meat onto the grill, and close the lid for about 60 minutes. The internal temperature of the meatloaf needs to hit 160 degrees, so take the meatloaf out when the internal temperature reaches 155 degrees, and rest the meat for a good 10 minutes.
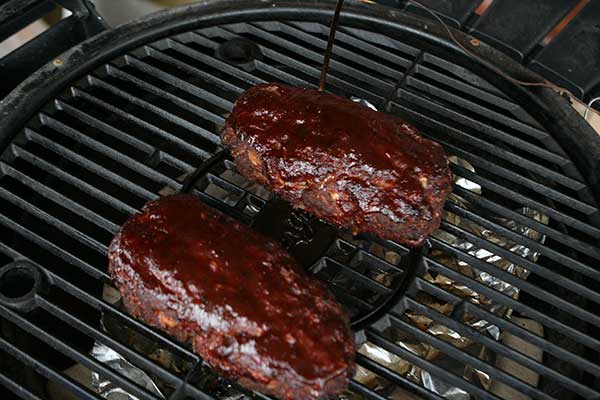
Serve with the remaining BBQ sauce and mayo if you’re that way inclined–and enjoy!
David B. February 13th, 2013
Posted In: BBQ Maintenance

In May, I first wrote about cooking pizza on the BBQ. This is a follow up post of sorts. Truth be told, homemade pizza on the BBQ has quickly become a family meal in our home, and our go to meal for indulgence and piggery.
Barbecuing pizza is not in any way a gimmick (something that you wouldn’t normally do, but do because you just love grilling)–it produces genuinely fantastic results that are better most pizza restaurants. It’s impossible to get pizza as good as from your home oven.
Ingredients for a pizza are kind of like a sandwich; whatever you have at hand, or feel like on the day. Mozzarella, pizza sauce, pepperoni, ham, pineapple, salmon, cream cheese, mushroom, onion, etc!
My three pizzas were: ham and pineapple; salmon (pre-cooked in the frying pan), red onion, and cream cheese; mushrooms, kalamata olives, and feta cheese.
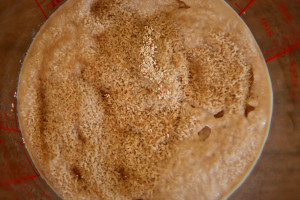
Step 1. Prepare the Yeast. Add the warm water into a 2 cup measuring jug. Sprinkle the yeast and let it stand for about five minutes, or until the yeast swells.
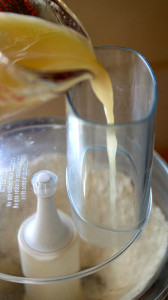
Step 2. Add the room temp water, and olive oil, and stir.

Step 3. Whizz the flour and salt in the food processor for 10 seconds. Add the yeast mixture while the food processor is running.
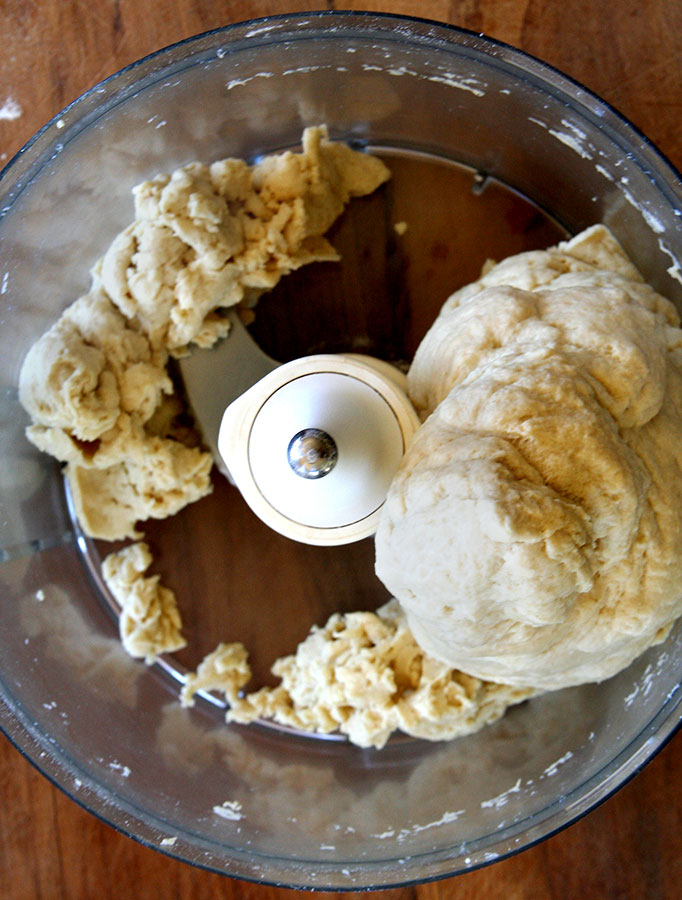
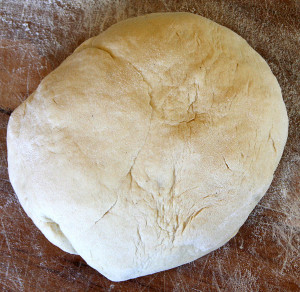
Step 4. Run the food processor until the mixture combines to a ball. Continue to process the dough for another 20-25 seconds. There will be a few stray pieces of dough (as pictured).
Step 5. Dump onto a floured prep surface and hand kneed a few times to finish off. The dough should be slightly elastic. Oil a large bowl, big enough for the dough to at least double in size. Add the dough and cover with plastic wrap. Put the dough somewhere warm for 2 hours, or until the dough doubles in size. Take a break – you’ll need to start preparing the BBQ and pizza toppings in about an hour.
Step 7. Prepare the toppings, and crank up the BBQ. For the sauce I’ve simply been using two cans of good canned tomatoes. Season them well and cook them low and slow for about 30 minutes, or until pizza sauce consistency is reached. You want all of your pizza toppings prepared and ready at hand, so cook/take out of packing/wash everything. Everything needs to be done very quickly, and you won’t have time to mess around.
At about 90 mins into the dough rising, load up your coals, or start up your grill. Pop your pizza stone on the cooking grid and close the lid. You want to get your BBQ really hot, around 600-650 degrees. Great care is obviously necessary at these temps (even when opening the lid).
NB: Never put a cold pizza stone on a hot BBQ! Always heat the BBQ up as you heat the stone up. Also, don’t leave the pizza stone on top of the pizza grid after the BBQ has cooled. Moisture can be trapped between the grid and the stone and cause your grid to rust prematurely.
Step 8. After the dough has risen. Separate the dough out in thirds. Roll or stretch one third on a prepared surface and transfer to a pizza peel sprinkled with cornmeal.
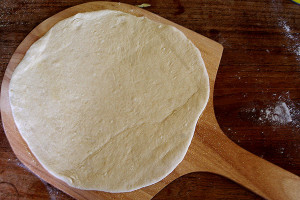
Step 9. Add your toppings
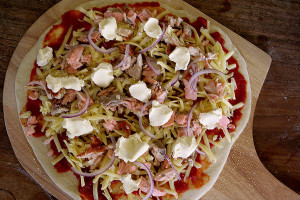
Step 10. Carefully transfer the pizza from the peel onto the pizza stone on the BBQ. Shut the lid as soon as possible and wait. Stay close to the BBQ and it wouldn’t be a bad idea at all to peak after just a couple of minutes to see how it’s going. It’s so easy to burn and a little heart breaking to have a fantastic looking pizza with a burned bottom. Here’s my ham and pineapple going on – and yes, I like a lot of pineapple on my Hawaiian pizzas.

Step 11. Repeat for the other two pizzas – then eat!
David B. January 4th, 2013
Posted In: BBQing HowTos, Recipes
Error Items |
LED |
TROUBLE |
TESTING |
| I/M-SENSOR (R on Twin I/M units) |  |
Ice Maker Sensor Error- open or short-circuit, connector failure. Cause is also a temperature reading > 122°or < -58 ° F | The voltage at MAIN PCB Sensor between 4.5V~1.0V |
| R-SENSOR |  |
Refrigerator Room Sensor Error- open or short-circuit, connector failure. Cause is also a temperature reading > 122°or < -58 ° F. | The voltage at MAIN PCB Sensor between 4.5V~1.0V |
| DEFROST SENSOR OF R ROOM |  |
Ref. Defrost Sensor Error- open or short-circuit, connector failure. Cause is also a temperature reading > 122°or < -58 ° F. | The voltage at MAIN PCB Sensor between 4.5V~1.0V |
| R-FAN ERROR |  |
This error indicates the Refrigerator Evap Fan is not spinning at the correct RPM or the fan feedback line is open. | Fan voltage at MAIN PCB shall be between 7V~12V |
| I/M FUNCTION ERROR(R on Twin I/M) |  |
This error indicates the Ice tray has not returned to level after an ice harvest. The error is displayed after three failed attempts. | Replace I/M |
| R-DEFROSTING ERROR |  |
Refrigerator Room defrost heater- open or short-circuit, connector failure, or defective temperature fuse/bi-metal. Defrost on over 80 minutes. | Disconnect defrost connector from PCB, check resistance |
| PANTRY-DAMPER HEATER ERROR |  |
Sensor system in Pantry Room errors. | Disconnect heater connector from PCB, check resistance. |
| PANTRY-SENSOR ERROR |  |
CR Room Sensor Error- This can be an open or short-circuit, contact failure. Cause is also a temperature reading > 122°or < -58 ° F. | The voltage of MAIN PCB Sensor between 4.5V~1.0V |
| WATER HEATER ERROR |  |
Error is displayed when the water reservoir tank heater is open or shorted. Disconnect heater connector from PCB, check resistance. | Disconnect heater connector from PCB, check resistance. |
| EXT-SENSOR |  |
Ambient Temp. Sensor Error- open or short-circuit, connector failure. Cause is also a temperature reading > 122°or < -58 ° F. | The voltage at MAIN PCB Sensor between 4.5V~1.0V |
| F-SENSOR |  |
Freezer Compartment Sensor Error- open or short-circuit, connector failure. Cause is also a temperature reading > 122°or < -58 ° F. | The voltage at MAIN PCB Sensor between 4.5V~1.0V |
| F-DEF-SENSOR |  |
Freezer Room Defrost Sensor Error- open or short-circuit, connector failure. Cause is also a temperature reading > 122°or < -58 ° F. | The voltage at MAIN PCB Sensor between 4.5V~1.0V |
| F-FAN ERROR |  |
This error indicates the Freezer Evap. Fan is not spinning at the correct RPM or the fan feedback line is open. | Fan voltage at MAIN PCB shall be between 7V~12V |
| C-FAN ERROR |  |
This error indicates the Condenser Fan is not spinning at the correct RPM or the fan feedback line is open. | Fan voltage at MAIN PCB shall be between 7V~12V |
| FRENCH DOOR ICE ROOM SENSOR |  |
Ice Room Sensor Error- open or short-circuit, connector failure. Cause is also a temperature reading > 122°or < -58 ° F. | The voltage at MAIN PCB Sensor between 4.5V~1.0V |
| F-DEFROSTING ERROR |  |
Freezer defrosting heater- open or short-circuit, connector failure, or defective temperature fuse/bi-metal. Defrost on for over 80 minutes. | Disconnect defrost connector from PCB, check resistance. |
| FRENCH DOOR ICE ROOM FAN ERROR |  |
This error indicates the Ice Room Compartment Evap. Fan is not spinning at the correct RPM or the fan feedback line is open. | Fan voltage at MAIN PCB shall be between 7V~12V |
| Uart ERROR COMMUNICATION |  |
This error is not applicable, if the error is detected during diagnostic testing please ignore it. | No Repair Necessary |
| L.M ERROR COMMUNICATION |  |
Communication error within the Main PCB | Replace main PCB |
| P.M ERROR COMMUNICATION |  |
Communication between the Main PCB and Keypad. | Check wiring in door & cabinet, Panel PCB, Main PCB |
David B. January 3rd, 2013
Posted In: Fridges and Freezers

The holiday season is here at last; time for family, for friends, and for food.
I wanted to try something a bit different for this post, a twist on a traditional thanksgiving dish. Pig candy came to mind (bacon caramelized with brown sugar, something I’ve wanted to try for awhile), and candied yams. Now that sounded like a fantastic combination.
And it was. Unfortunately I got too excited and forgot to take pictures before the sticky goodness was scoffed by my family. There were no yams left for a second round, but I did have a jar of pineapple chunks, and another pack of bacon. Salty-sweet caramelized bacon wrapped around the juicy bite of pineapple? Oh yes, it was meant to be.
I used a grill of course, but I imagine you could cook these in a frying pan (or even in the oven) just as well.
Ingredients
1/2 pound of bacon
Pineapple chunks (fresh or canned)
1/2 cup of brown sugar
1/2 teaspoon of cinnamon (optional)
If you’re using a fresh pineapple, cut and prepare the pineapple into chunks.
Preheat the oven, and cook the bacon at 350 degrees for approx 20 mins. The bacon should be cooked, but still soft.

Wrap each chunk of pineapple with a strip of bacon (cut the bacon if it’s too long), and skewer this bundle with a toothpick. Now rub thoroughly with brown sugar.

Preheat grill to low, and cook.
Because your bacon is already cooked, the grilling step only really involves caramelizing the brown sugar and crisping bacon. What you don’t want to do is burn the sugar so watch vigilantly and move them to a cooler spot on the grill or remove them entirely, if needed.
(Be forewarned that grilling any sugar makes a mess, be prepared for a little clean up afterwards. It should not be more than a little elbow grease.)
David B. November 20th, 2012
Posted In: Appetizers, Desserts and Fruit, Recipes

Scrumptious and garlicky; these shrimp are perfect as an appetizer or the feature in a fantastic salad.
If you really want to splurge, get enough to fill up on –you won’t find a tastier meal.
Serves 4
12 large shrimp or prawns
1/4 cup butter
2 garlic cloves, minced
1/4 cup lemon juice
2 tablespoons freshly chopped parsley
Sat and freshly ground pepper
Minced red chili or red pepper flakes (optional)
Lemon wedges
1. Preheat grill to medium heat.
2. Shell and de-vein the shimp, leaving the tails on if desired.Put them in a large zip lock bag.
3. Melt the butter and mix in the rest of the ingredients, except the lemon wedges. (If you like things extra garlicy, go ahead and add another clove) Don’t forget to season with salt and pepper!
4. Pour the butter mixture into the bag with the shrimp, push out as much air as you can, and leave to marinate for about half an hour in the fridge.
5. You can either grill them directly separatly, or by threading them onto a skewer for less tedious turning. If using a skewer, curve the shrimp around and push it through both the tail and near the head.
6. Grill for a couple minuts on each side. Serve with lemon wedges and gobble them up. 🙂
David B. October 15th, 2012
Posted In: Appetizers, Meat, Poultry, and Fish, Recipes, Salads

Planking is a great, easy way to grill; and is particularly suited to delicate foods like fish. The wood plank protects the flesh from the intensity of the flames or burners while imbuing it with delicious smokey flavors. However longer cooking meats like chicken will always pick up more smokiness since they’re exposed to the smoke for much longer.
And planking isn’t only for those cooking with charcoal, this technique works perfectly on gas grill as well!
You can use a variety of timber for planking, cedar isn’t the only option. Apple, alder, hickory –just be sure the wood isn’t treated!
Before grilling, the wood needs to be soaked it in a tub of water for at least an hour (to reduce the chance of it catching on fire). For another layer of flavor try adding a cup of juice or a splash of bourbon to the soaking water.
After soaking, put the plank on a preheated medium grill for a couple minutes on each side. You want the plank to be smoking and cracking before you put your food on it –this will make sure you get the maximum smokey flavor.
Now you’re ready to cook! Brush some oil on the hot plank, and put your food directly on it. No turning needed. Be sure to keep the lid closed as much as possible since a lot of the flavor from planking comes from the smoke.
A few other notes:
Be sure to keep a spray bottle on hand while cooking on a plank. The wood can catch fire, you need to be able to quickly extinguish any flare-ups.
Even though salmon is the traditional planking food, don’t limit yourself. Pretty much any fish is delicious cooked in this way. Also chicken, pork loins, vegetables. Really, anything you’d cook over an indirect heat. Marinate and season as you’d like, then cook it on the plank.
Cedar planks can be reused a number of times, as long as there is wood left. Depending on the length of cooking, I would expect around three uses. Don’t forget to soak it before each use.
Be sure to remove the plank as soon as you’re done cooking, otherwise the wood will just burn up. And if you’re using a gas grill, it will make a big mess in your burners.
Sauce:
1/4 cup pineapple juice
1/3 cup soy sauce
2 tablespoons apple cider vinegar
2 tablespoons lemon juice
1 tablespoon olive oil
3/4 cup honey
1/4 cup brown sugar, packed
1/2 teaspoon cayenne pepper
1/2 teaspoon paprika (Preferably hungarian paprika. Try smoked paprika for an even bigger punch. Or even smoked spicy paprika.)
1 garlic clove, minced
Freshly ground black pepper (about a teaspoon)
6 salmon filets, skinless and boneless
Salt
Freshly ground black pepper
2 cedar planks
Directions:
Prepare the planks as above.
Preheat the grill, medium heat.
Put the juice, soy sauce, vinegar, lemon juice, oil, and honey in a small saucepan and bring to a simmer over med-high heat. Reduce to med-low and stir in the rest of the sauce ingredients, cooking until it has reduced to and coats a spoon. About 20 minutes. Remove from the heat.
Sprinkle the salmon filets with salt and pepper
Your cedar planks should be finished soaking and be ready to put on the preheated grill. Leave them for a couple of minutes over the burners, until they start to smoke, then brush them with oil and pop the salmon filets on top. Close the lid, cook for 5 minutes, then spread a little of the sauce over the salmon. Put the lid back on and cook another 5 minutes. Apply another layer of glaze to the fish. Cook another 5 minutes or until the fish is opaque throughout.
Serve with the rest of the sauce, and enjoy. 🙂
David B. September 3rd, 2012
Posted In: BBQing HowTos, Meat, Poultry, and Fish, Recipes

One of the things I like about grilling is being able to make simple recipes fantastic. You can hardly get easier or quicker than this one, but it never ever gets old. All the ingredients should either be on hand or readily available. Who doesn’t like buttery garlic bread?
1 French bread stick
1 1/2 stick salted butter, room temperature
3-4 cloves of garlic, minced
1/4 cup minced fresh parsley
1/2 tsp black pepper, ideally freshly ground
1/4 cup parmesan, grated (fresh if possible, it has much more flavor)
Cajun Seasoning – We used their fantastic Slap Ya Mama – White Pepper Blend
Preheat the grill with one burner on high and another on low.
Cut the bread stick as you would like, rounds, diagonal slices, fingers; about 1/2 thick. Place these pieces on a tray for transporting to the grill.
In a medium sized bowl, beat the butter until creamy with a whisk, food processor or mixer. Add the garlic, parsley, pepper, and cheese. Continue beating until it’s fluffy.
Now you need to season the fluffy mix with your cajun seasoning. Add a little at a time, mix, then taste. Create a nice warmth, but don’t overpower the garlic and cheese flavors.
Spread the mixture on both sides of the bread.
Place the prepared bread on the grill and cook until both sides are golden. Watch very carefully! And move the bread to a cooler area of the grill if it starts to burn. It should take around 1-3 minutes for each side.
David B. August 5th, 2012
Posted In: Appetizers, Breads, Recipes

A quick and easy recipe that doesn’t sacrifice deliciousness. Great for a quick meal or cut into fingers and have as a finger food starter. BBQ sauce adds a fantastic depth to standard grill cheese sandwiches. I used Grumpy’s Private Reserve Black Label which had a perfect spicy smokiness, really delicious with the cheese, but other BBQ sauces are great too.
Sliced bread, for as many sandwiches are you want – I used a thick sliced sourdough bread which gave a nice chewy bite to the sandwich.
Cheese, sliced – There are a variety of cheeses you could be used, but you’ll get the best results from one that melts well. (Pre-sliced cheese may be easy, but it never has as good of flavor)
BBQ Sauce – I used Grumpy’s Private Reserve Black Label.
Butter, room temperature for spreading.
Turn one burner to medium and another to low. You’ll cook the sandwiches on medium heat, but can move them to the cooler area if they start to burn.
Butter one side of each bread slice. Lay half the slices butter side down and spread with a generous helping of bbq sauce. The quality depends on how sloppy and spicy you like your food. Layer on the sliced cheese, in another generous helping. Top with a slice of bread, buttered side up. Squish them down a little.
Use a tray or plate to bring the sandwiches to the grill, place them over the burner turned to medium. Press them slightly with a metal spatula while they’re cooking to ensure they adhere together. If the bread starts to burn before they’re done, move them over the burner that’s on low. The sandwiches are done with the cheese is nicely melted and the bread is golden.
David B. June 20th, 2012
Posted In: BBQ Maintenance

Grilling a pizza is one of those things that I’ve always planned to get around to.. in the future. Maybe it was the tinge of weirdness, or additional steps required after making a pizza by hand, but I’ve always decided to do it a different day, or a different occasion.
Procrastination aside, I finally started trying to grill pizzas over the last few weeks, and it’s been a revelation. Not of divine proportions, but probably about as close as you could get from a pizza lover.
The fantastic thing about cooking pizza on the grill is you can get the pizza to a much higher temperature than a conventional oven. You also get a smokey, barbecuy taste that can’t be matched.
Grilling is always an imperfect science at the best of times. Getting the condition right for your particular grill or barbecue takes time. We had a few disasters here, quite a few.. 2 totally burnt pizzas, a dropped pizza (that one almost ended in tears), and a few that still tasted good but I knew could be better. So don’t despair, it’s worth the persistence, well worth it!
Because the pizza cooks so fast, and the heat can be very very hot, we’ve found you get more consistent results with a thin base and thin toppings. Feel free to experiment.
Using a gas grill: Make sure your burners are in tip top shape, and not producing any hotspots Using a charcoal bbq: Keep your coals even across the span of the pizza stone.
There are two schools of thought with grilling pizzas. One is to cook your pizza straight on the grid with an indirect heat source. The other is to use a pizza stone. Using a pizza stone tended to even out the heat a lot better, reduced the risk of burning the pizza, and of course you can compile the pizza in the kitchen rather than on the grill itself.
This recipe is great on the grill. It makes 2-3 pizzas depending on the size of your pizza and how much pizza dough is stolen. I tend to split the pizza dough in thirds, use one, and wrap the other two separately with lots of plastic wrap and store it in the fridge.
1/2 cup warm water (110 degrees)
1 envelope instant yeast
1 1/4 cups water; at room temperature
2 tablespoons extra virgin olive oil
22 ounces bread flour
1 1/2 teaspoons of salt
1. Sprinkle yeast onto the warm water for about 5 minutes. Then add the room temperature water and olive oil.
2. Mix the flour and salt in a food processor. Pulse the food processor while adding the liquid ingredients from step 1. Process until dough comes together, and is smooth and stretchy.
3. Dump out onto a floured work surface. Kneed briefly to form a ball.
4. Put the dough into a large oiled bowl and cover with plastic wrap. Let rise in a warm place, 1/2 to 2 hours.
This sauce is exceptionally simple, and works best with fresh tomatoes, but you could use canned.
1 lb tomatoes
1 Tbsp Olive oil
2 cloves garlic
Salt to taste
1/4 cup good bbq sauce, such as Grumpy’s Goodnight Lovin’
1. Heat a saucepan over medium heat and add the Olive oil and garlic for 30 seconds, being careful not to burn it.
2. Add in the tomatoes and simmer until the tomatoes melt down and thicken, about 20 minutes
4 oz Mozzarella, shreaded or cut half inch thick
8 oz Pepperoni, peeled and thinly sliced
That’s it. You could do whatever you want for a topping and sauce, but remember, be spartan: less is more, especially on the grill.
1. You want an even heat distribution over your grill. If you’re using gas, turn on all burners, if charcoal, spread coals evenly across the bbq. Put the stone in when the grill is still cold, and close the lid for it to preheat (about 20 minutes depending on your grill).
2. Sprinkle semolina or cornmeal onto a pizza peel, then place your pizza dough onto the peel. If you don’t have one, you might need to improvise a little.
3. Add the sauce, and toppings.
4. Take the pizza peel over to the grill and slide the pizza onto the pizza stone.
5. Cooking times vary greatly but you want to take the pizza off when the crust starts browning in spots, about 5-10 minutes. Be sure not to leave it unattended as it can go from delicious looking to a burnt mess in minutes (from experience).
David B. May 2nd, 2012
Posted In: BBQing HowTos, Recipes