Summer feels like it’s finally here, everyone is unpacking their camping gear and revving up their BBQs. It’s a time for family, friends, and good food. With that in mind, we’ve come up with a fantastic menu to kick off this grilling season.


Quesadillas on the BBQ are so easy and they taste fantastic, I particularly like them with the Cheesy Tomato Dip.


These hamburgers take a bit longer to prepare than normal, but they are well worth it for something extra special. And I can’t emphasize enough how delicious this potato salad is, please, please try it!

Grilled Pineapple? Yes, it is fabulous. Just thinking about those hot skewers dipped in chocolate makes my mouth water. So yummy.

Berry Lemonade, drink it as is or spike it with vodka, either way it’s the perfect summer drink. Hmm wait, maybe that title should go to beer…
David B. May 29th, 2010
Sweet, sour, and refreshing – the perfect summer drink. Add some vodka if you want a kick.
This recipe is part of our Memorial Day Menu.
Makes: 2 pitchers
Ingredients:
Step 1: Preparing the Berries


– Puree the berries in a blender with about 1 cup of the lemonade until smooth.
Step 2: Mixing it Together


– Pour the lemonade into your pitchers, top with the pureed berries and stir to combine.
– If you don’t want the berry seeds in your lemonade, strain the lemonade through a fine sieve and put into the pitchers.
David B. May 29th, 2010
Quesadillas on the BBQ? Yes it is as good as it sounds! Crispy on the outside, cheesy and peppery on the inside – it doesn’t get much better. They’re good on their own, but for a real treat try them with our Cheesy Tomato Dip, yum.
If you want to make the recipe even simpler, you could just use salsa and cheese for the filling, it is still delicious.
This recipe is part of our Memorial Day Menu.
Serves: 6-8
Ingredients:
Step 1: Starting the Grill
– Preheat your grill to medium low heat.
Step 2: Preparing the Filling
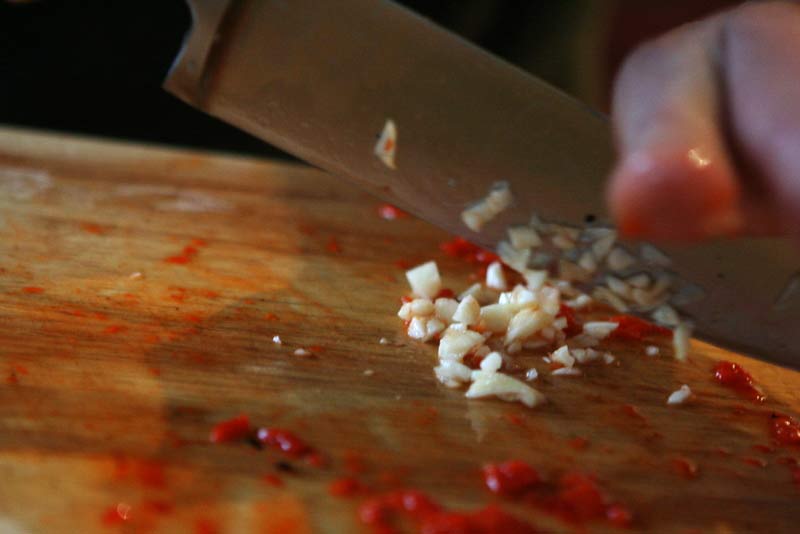
– Mince the roasted red peppers, chipotle chiles (if using), garlic cloves, and cilantro.
– Put them all into a small bowl and mix together with some salt and pepper to taste. (If you’re using salsa, add this now)
– Grate your cheese if it’s not already done.
– Slice the red onion into thin half moons and separate the segments.
Step 3: Assembling


– Place on tortilla on a plate and brush the top of it with olive oil.
– Flip the tortilla over and spread a third of the pepper mixture onto it, leaving a border of around 1 inch clean on all sides.
– Place some slices of onion on top of the peppers.
– Top with a third of the grated cheese.
– Put a second tortilla on top and press down slightly. Brush oil onto the top of this tortilla.
– Prepare the rest of the tortillas in the same way.
Step 4: Grilling


– Bring the quesadillas out to the grill on a plate. Also take a heavy frying pan or smilar (without a plastic handle).
– Slide the quesadilla onto the grill (as you can see we could only fit on one quesadilla at a time), and carefully put the frying pan on top of it to weight it down. If you’re cooking more than one quesadilla at a time, just move the frying pan around, it doesn’t have to be on them all the time.
– After a few minutes the bottom tortilla will go crispy, flip the quesadillas over now and brown the other side. Replace the frying pan to make sure they’re nice and flat.
– They’re done when both sides are crispy and the cheese has melted. This should only take a few minutes.
Step 5: Serving
– Cut each tortilla like a pie, into 8 pieces.
– They’re yummy on their own, but even better with a dip. I particularly like them with our Cheesy Tomato Dip and Creamy Guacamole.

David B. May 29th, 2010
Posted In: Appetizers, Recipes

Makes around 4 cups
This is my favorite guacamole recipe; I love how the cream cheese makes it extra creamy. And paired with the lime juice, I could eat it with a spoon!
This recipe is part of our Memorial Day Menu.

Ingredients:
To serve:
Step 1: Preparation


– Cut the avocados in half and remove their stones. Then scoop out the flesh and put it in a bowl.
– Finely dice the onion and garlic, add these to the bowl with the avocado.
– Squeeze the juice out of the lime, using either your hand, a fork, or a citrus juicer and add to the bowl.
– Cut the tomatoes up into a small dice and set aside.
Step 2: Mixing it up


– Add a bit of salt, pepper, and crushed red pepper (or cayenne).
– Now add the cream cheese and mix/mash it all up. (Make sure the cream cheese is nice and soft! You can always put it in the microwave for 10-15 seconds at a time to soften it more) You can do this in a food processor or blender if you want, but the thought of having to clean an appliance always motivates me to do it by hand.
– Make sure the cream cheese and avocados are well mixed together, and then stir in the chopped up tomatoes. (The tomatoes are stirred in after the mashing stage so they don’t get turned to mush)
– Now the most important part, checking the flavors! Don’t skip this part; it is crucial for a well balanced guacamole. Try tasting it with the chips or whatever you’ll be eating it with. Does it need more lime juice? More salt? More red pepper?
Step 3: Serving
Scoop the mixture into a nice bowl and top with chopped cilantro
Of course guacamole is good with chips, but it is also delicious with our Grilled Quesadilla recipe.

David B. May 29th, 2010

A delicious creamy tomato dip with a touch of spice. It’s very easy to make and you can easily double or even triple the recipe to feed a crowd.
This recipe is part of our Memorial Day Menu.
Ingredients:
To Serve:
Step 1: Making the Tomato Mixture


– Chop up the onion and green pepper, and then fry them in a pot with a little olive oil until they’re soft.
– Chop the jalapeno and add it with the can of chopped tomatoes and the cumin to the pot with the onions.
– Bring this tomato mixture to a boil.
Step 2: Making it Creamy
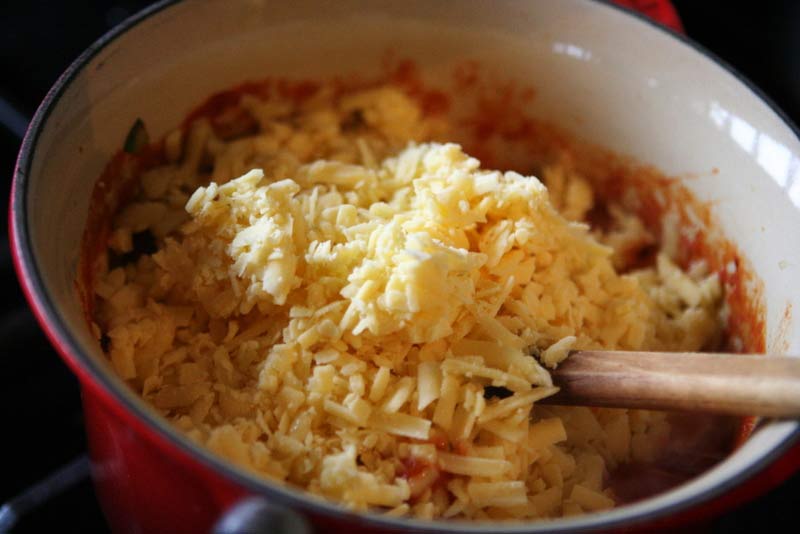
– Grate the cheese if it’s not already done, and toss it with the flour.
– Add the cheese to the hot tomato mixture and stir until it is melted and smooth.
Step 3: Serving
– Scoop the dip into a nice bowl and top with sour cream, freshly chopped cilantro, and sliced green onions.
– Of course this dip is delicious with corn chips, but for something a bit special, try it with our Grilled Quesadillas.

David B. May 29th, 2010

This is the best potato salad I’ve ever tried; it’s the perfect balance of flavors. I normally serve it with steak or hamburgers, but every time I wonder why I even bothered with the meat. All I want is a big bowl of this salad!
This recipe is part of our Memorial Day Menu.
Ingredients:
Step 1: The Potatoes


– Keep the potatoes whole, but cut out any bad spots. Put them in a pot and cover them with water. Simmer until a sharp knife or a skewer can poke through them easily. This should take around 25-30 minutes, but will depend on how large your potatoes are.
– Drain and let the potatoes cool slightly before cutting into ¾ inch cubes. (Make sure to use a very sharp knife, or even better, use a serrated one. This will help give clean cuts through the skin.)
– Put the potato cubes in a bowl and toss with the vinegar, salt and pepper (about ½ teaspoon of each). Put the bowl in the fridge until the potatoes are cool before adding the dressing.
Step 2: Preparing the Dressing Ingredients


– Cook the bacon in a little oil in a frying pan until crispy, remove and chop up into small pieces.
– Peel the hard boiled eggs and dice them.
– Finely chop the celery stick; you want about ½ cup in total.
– Finely chop the red onion and the pickles
– Mince the parsley
Step 3: Mixing it All Up

– Take the potatoes out of the fridge and add all the prepared ingredients to the bowl, including the mayonnaise and mustard.
– Toss together gently (try not to mash the potatoes up) and season to taste. You will probably have to add quite a bit more salt and pepper, so be sure to taste it and adjust accordingly!

David B. May 29th, 2010
If you’ve never tried it, grilled pineapple may sound a bit strange. But trust me; this is one of the simplest and most delicious desserts you could make. Not to mention it has the added benefit of being fun! Who could resist dessert on a stick dipped in bowls of molten chocolate?
This recipe is part of our Memorial Day Menu.
Serves:Â 6-8
Ingredients:
Step 1: Start your Grill and Prepare the Skewers
– Preheat your grill to low heat.
– Soak the bamboo skewers in cold water
Step 2: Prepare the Chocolate Sauce


– Grate the chocolate.
– Put the cream in a pot and bring to a boil (or close to one).
– When the cream is very hot, remove from the heat and add the grated chocolate, stir until melted.
– When you’re ready to serve the dessert, pour the chocolate into little bowls for people to dip their pineapple into. (If the chocolate has cooled too much, you can reheat it very gently on the stovetop)
Step 3: Prepare the Pineapple


– Cut the top and bottom off the pineapple, then slice all the scaly skin off the sides.
– Cut the pineapple into quarters, vertically, and cut each of these quarters into three slices, lengthwise.
– Remove the woody strip from all the pineapple slices. (Make sure this is totally removed, there’s nothing worse than biting into a succulent piece of pineapple, only to find something hard)
– Slide the pineapple onto the skewers, lengthwise.
– Coat the pineapple heavily on all sides with brown sugar.
Step 4: Grilling


– Place the pineapple on the grill, make sure it’s not too hot or the pineapple will burn instead of caramelizing.
– Flip the pineapple when the underside looks like it has caramelized nicely.
– It is done when both sides are golden and slightly scorched.
Step 5: Serving
– Serve on a large platter with the chocolate sauce (this can be reheated on the stovetop very gently on low heat if it has cooled a bit), dip and enjoy!
David B. May 29th, 2010
Posted In: Desserts & Fruit, Recipes
A popular grill recipe, we found a number of variations when we were researching ideas for our experiment. Some people smoked the bird, some covered it in a rub, some brined, some even baked in the oven! However the one thing we didn’t find were any tests on the various flavors you could get from using different beers – every recipe we saw either used a lager or didn’t specify.
Since the recipe seems to center around beer we were a bit surprised that more attention hadn’t been given to this aspect. However, as keen beer drinkers we were more than prepared to do the leg work ourselves. A quick stop at the supermarket later we had our supplies: 3 bottles of beer (1 Dopplebock (Aventus), 1 extra hoppy IPA (Epic Armageddon), 1 strong English Ale (Fuller’s 1845), 3 chickens, and 1 can of Dr Pepper (a good excuse to buy my fizzy drink of choice).
The technique can basically be divided into 4 steps: prepare the can, prepare the chicken, insert the can, and place on the grill. Something so simple surely must not have much room for error. Well, it does.
Our first chicken used the Strong English Ale. The can was half filled, inserted, and cooked without any problems. A delicious, crispy skinned bird resulted. However, we couldn’t taste any beer flavor or anything that we could contribute to the beer. It just tasted like a very nicely cooked chicken.
Our second chicken was paired with the extra hoppy IPA, or at least it was supposed to be. The can was half filled, as required, and the rest of the bottle was quickly polished off. Then we moved onto insertion, this was a mistake! With no beer reserves, when the can tipped over during the first insertion attempt and we lost around half of what was in the can, we were in dire straits. Yes, I admit, there was a small amount of cursing going on in the room. Then, at the second insertion attempt, when the greasy chicken flew out of my husband’s hands and skidded across the kitchen floor… well it was just hysterical laughter at that point. Of course by now the can was empty. We made a quick substitution of a tasty Mead (medium sweet), thinking a honey flavor could go quite nicely with chicken, and finally managed, on the third try, to get the can into the chicken. This one cooked up beautifully again, crispy skin, succulent flesh, but no apparent flavor from the mead.
Our third chicken was cooked with Aventus Dopplebock (the best beer of the bunch in my opinion). Everything went smoothly and the result at the end was again nicely cooked. This time however, we could taste some flavor imparted by the beer, albeit faint. The chicken was mildly richer and slightly sweeter. It also gave the flesh a rosy pinkness. I have to stress that these differences were very mild, and I personally would get much more pleasure out of drinking every drop of this beer myself.
So in conclusion, the technique itself produces nicely cooked chickens with the important crispy skin, however the beer used didn’t seem to make must of a difference. From our results it seems likely that any liquid would do the trick. A bit disappointing, but interesting nonetheless.
I wonder what would happen if I marinated the chicken in the beer though… hmm

Ingredients:
1 whole chicken
1 can (if your beer of choice is in a can, then use that, but if you’re using a bottled beer then use a soda can)
1/2 a can of beer
Butter or olive oil
Salt and Pepper
–Because the main purpose of this experiment was to test the results of using different beers, we decided that smoking the chicken or applying a rub would cover up the beer flavors and so shouldn’t be used in our experiment. However, if you want to smoke or put a rub on your Beer Can Chicken, feel free! We have included instructions for both.–
Start your grill so it has time to preheat before putting the chicken on to cook.
We used a gas grill for this recipe, but if you want to use a charcoal BBQ, that will work as well.
This recipe uses indirect cooking. If you are using a gas grill, make sure to only turn on a burner away from where the chicken will be sitting. (We used a temperature of Med-High). If you are using a charcoal BBQ, make sure to move the coals either to one side (so the chicken can be place on the opposite side of the grill), or to both sides with an empty space in the middle (so the chicken can be placed in the middle over this empty space).
Smoking: If you are smoking your chicken, start soaking the wood chips now.


If you’re using a soda can like us, then drink all the contents, otherwise, if the beer you’re using is in the can, drink approximately half the can.
Poke some holes in the top of the can (we made 6 holes) using whatever aluminum poking instrument you have handy. We used kitchen shears, maybe not the best option, but it was all we could find. For our second chicken we cut the top all the way off in the hopes that this would increase the beer penetration. However, it didn’t seem to make much of a difference.
If you’re using bottled beer, fill the can halfway. Make sure to let the foam settle before drinking the rest, you may need to top up your can!

Now you need to grease up and season the chicken. This will give you crispy skin that you won’t be able to resist no matter how health conscious you are. (Yes I admit it; crispy skin is my favorite part of the whole chicken).
Using someone else’s hands (if you’re like me and hate touching raw meat), rub softened butter or oil all over the chicken.
Season (generously!) with salt and sprinkle on some black pepper. (Of course this does come down to personal taste, but I like my chicken skin only lightly peppery but very salty, think potato chips.)
Applying a Rub: If you are putting a rub on the chicken, do this instead of seasoning with salt and pepper. Rub your chosen dry rub all over the chicken, particularly under the skin as much as possible, and then rub oil all over the chicken. See the rub recipe at the bottom of this post.


Really, it is impossible not to laugh at this step.
Insert the can half filled with beer into the chicken’s opening. It is at the rear side, hence the other name for this recipe ‘Beer Butt Chicken’.
Be careful not to tip the can over or drop the greasy chicken like we did.

Carefully place the can with the chicken on top onto the preheated grill. Make sure to put it on the side away from the heat source.
Put the lid on and open the top vent.
Cooking time can vary considerably, depending on the size of your bird and the actual temperature of your grill. An instant read thermometer will be the most accurate way to tell when your chicken is done.
Check the temperature after 1 hour by sticking the thermometer into the chicken’s thigh (making sure not to touch the bone) and the breast, it will read 170 degrees F when the chicken is done.
Smoking: If you are smoking the chicken, put the drained wood chips on the coals when you put the chicken on the BBQ.

——
This recipe is a great starting point, adjust and add to it as you like.
Ingredients:
4 Tablespoons paprika
2 Tablespoons salt
2 Tablespoons sugar
2 Tablespoons brown sugar
2 Tablespoons ground cumin
2 Tablespoons chili powder
2 Tablespoons freshly ground black pepper
1 Tablespoon cayenne pepper
Combine all the ingredients in a small bowl and mix well. Reserve until needed.
David B. May 17th, 2010
Posted In: Meat Poultry & Fish, Recipes

This recipe is incredibly easy and delicious, but keep in mind that cooking time is 2 hours.
We made this recipe with two different flavors of Grumpy’s BBQ sauce. The ‘Good night loving’ Texas Style and the ‘Bold XX’ Kansas City Style. The Tasters (Me, my husband, my mother-in-law, and my nephew) were divided in our favorites. However we all agreed that the Texas style is a bit spicier (but oh so delicious, yes you guessed it, my favorite was the Texas style). We still have two more flavors of Grumpy’s BBQ sauces to try, but so far I’m impressed with them, very, very delicious.
Serves 2-3 if you’re hungry
(If you don’t have any chili powder, you can make your own by mixing 1 teaspoon paprika, 2 teaspoons cumin, 1 teaspoon cayenne, 1 teaspoon oregano, 2 teaspoons garlic powder)
Start up the BBQ. Because we are smoking the ribs in this recipe, we used a charcoal bbq, but if your bbq can’t smoke, don’t worry, even unsmoked these ribs are very tasty. The coals should be placed as far to one side of the bbq as possible. The ribs will be going on the opposite side, as far from the heat as possible, we want them to cook slowly.
Soak the wood chips. It’s important to soak the wood chips until they are fully saturated this is so they don’t catch on fire and burn up when they’re put on the hot coals. We want smoke, not flames. Ours were more sawdust than chips, so they only needed half an hour, but if you have larger chunks you may need to soak them for an hour.


To get delicious tender ribs, the important first step is to remove the membrane on the back side. Turn the rack so the boney side is facing up. Using either your fingers or a butter knife, pry up a bit of the membrane at one side of the rack. (picture 1)
Pull the membrane that you have pried up, you want to pull it across the ribs, removing all the membrane. If you’re lucky it will come off in one piece! The membrane can be quite slippery, so if you’re having trouble gripping it try using a paper towel. (picture 2)
Two racks with membranes removed. (picture 3)


Mix together the cumin, chili powder, paprika, salt, and pepper in a bowl.
Sprinkle the rub onto both sides of the rack, you don’t have to use all of it.
NOTE: Be careful to only lightly rub the mixture into the meat. If you rub it in too vigorously the flavor becomes very intense.


Make sure the coals are stacked at one side of the bbq and are white hot.
Bring your ribs and soaked wood chips to the bbq. Drain off as much water as you can from the wood chips
Remove the grate and put the wood chips on the hot coals. Use your hands to do this, and squeeze out excess water before putting the chips on the coals. Replace the grate.
Place the ribs on the grate, as far from the coals as possible. Since they will be cooking for a total of 2 hours, we don’t want the coals to be cooking them directly. Make sure the ribs are meaty side up.
Put the lid on the grill, make sure it is positioned so the vents are on the same side as the meat, this way the smoke has to pass over the meat to escape.
Adjust the vent opening so it is only ¼ open, and enjoy the smoke show.
Leave the bbq for one hour. Do not open the lid to peek!


Now that you’ve patiently waited one hour, remove the grill lid.
For this second hour you need to baste every 15 minutes with your chosen BBQ Sauce (as I mentioned in the introduction, we used two different Grumpy’s BBQ Sauces, their ‘Goodnight Loving’ Texas Style and their ‘Bold XX’ Kansas City style. Both of them were incredibly delicious, I liked the Texas style best, however my husband disagrees and thinks the Kansas City one has the edge.)
After the last basting, leave the ribs on the bbq for 5 more minutes (make sure to put the lid back on). Then remove and prepare to eat!


Serve the ribs with a nice green salad, such as our Bacon Lettuce, Avocado, and Tomato Salad, french fries, or both!
David B. May 2nd, 2010
Posted In: Recipes
This is a delicious salad either as a meal on its own or as a side dish. At the moment it is probably my favorite and most common lunch meal. The ingredients seem to change each time I make it, but some of my favorite variations are: feta instead of cheddar, halved olives (kalamata preferably), button mushrooms halved and cooked in a frying pan with some butter and salt.
This recipe is part of our Memorial Day Menu.
Ingredients:
These ingredient quantities are very loose, feel free to vary them depending on what you have available, personal preference, and the amount of people you’re serving.
Makes 4 large servings (it’s so good that a small serving just isn’t enough)


Cook your bacon in a frying pan with a little oil. How long you cook it for depends on your preference. I like it crispy, my husband likes it chewy, so we cook it until slightly crispy as a compromise (that way neither of us are entirely satisfied). When the bacon is done to your liking, chop it up.
Chop the onions finely, the idea is to have they pieces small enough that they mix in and you don’t get big bites of onion while eating the salad.
Slice the avocados into fairly large chunks, be careful not to make the pieces too small or they will dissolve into mush when you toss the salad
Cut the tomatoes into halves or quarters if you’re using cherry tomatoes, otherwise cut them into a chunky dice.
Wash the lettuce and chop it into bite sized pieces, even if the leaves you start with are fairly small, like baby spinach, it still makes for a much nicer salad if you chop them up into smaller pieces.
Grate a couple of handfuls of cheese, if you don’t want cheese in your salad, feel free to leave it out, it will still be delicious!


Put the lettuce in a large serving bowl, add the tomatoes, onions, avocados, bacon, and cheese. Mix it up and decide if the proportions of the ingredients seem right to you. Since we had found such delicious tomatoes at the farmer’s market, we decided to put a few more in.
Drizzle some caesar dressing over the top, but don’t put too much on, it goes further than you’d think. Mix it up again, the dressing should finely coat all the ingredients but not be gloopy. (However, if you like gloopy salads, then by all means, add some more!)
Don’t forget to taste it. Does it need salt or pepper? Add if necessary (This will depend on the brand of salad dressing and the amount you’ve used).
Ta-Da! A delicious BLAT salad awaits, which by the way, goes perfectly with our Fool-Proof Baby Back Ribs Recipe.
David B. May 2nd, 2010
Posted In: Recipes


